
SalesBlink – A Complete Guide To Automated Cold Outreach
Do you know that sales automation has helped 61% of businesses exceed their revenue targets? (Hubspot). As this is the era of artificial intelligence and automation, why should you not go with the flow? However, choosing the right tool to automate the sales process is extremely important if you want to get good profits.
We have SalesBlink for you, the handy sales outreach automation tool, which is a one-stop solution for cold outreach. It helps with smarter outreach thanks to its in-built AI, BlinkGPT to create templates & sequences.
In this blog post, we’ll help you explore the tool and understand its exciting features that can help you convert prospects into customers faster.
So, let’s dive in!
Table of Contents
Finding Leads With SalesBlink
Finding leads is a crucial step in any automated cold outreach strategy. Platforms like LinkedIn offer a vast network of professionals across various industries, making it an invaluable resource for identifying potential contacts. Leveraging LinkedIn’s advanced search features can help narrow down prospects who best match your target audience criteria.
For more direct contact information, tools like Lusha and Seamless.AI come into play. Lusha provides access to phone numbers and email addresses with a simple browser extension, streamlining the process of connecting with leads. Similarly, Seamless.AI specializes in using artificial intelligence to generate a high-quality list of leads with verified contact details. This ensures that your outreach efforts are directed at the most relevant and accessible prospects.
Incorporating these tools into your automated cold outreach strategy can significantly enhance the efficiency and effectiveness of your lead generation efforts.
Also, SalesBlink verifies the email addresses in real time and provides a confidence score to send emails to valid addresses. This ensures you have a good sender reputation and email deliverability so that you will always land in prospects’ inboxes.
Outreach With SalesBlink
After finding prospects’ contacts, the next step would be to reach out to them. You can create email templates from scratch or generate them with SalesBlink’s BlinkGPT. The tool also enables you to personalize emails at scale. You have both text and image personalization to make the prospect feel important. It will definitely help you get more responses.
You can create sequences and send follow-ups on autopilot with SalesBlink. While you can build sequences from scratch, SalesBlink’s BlinkGPT creates complete sequences for you under 90 seconds.
Once your sequence is running, feel free to track clicks, opens, replies, and bounces to know the performance of your outreach sequence.
Closing With SalesBlink
When you send outreach emails, it is likely that you would want to schedule a meeting with the prospects. How about providing a link to your availability calendar and letting them pick a time and date?
SalesBlink’s in-built meeting scheduler helps you do just that. It enables prospects to schedule meetings effortlessly with you, and there’s no need to depend on an external tool.
All you have to do is share your meeting scheduler link with the prospect in your outreach email, and the rest is easy. You can even embed the meeting scheduler to your website’s page to enable prospects to book a meeting with you from within your website.
It is also possible to change your working hours and customize your meeting scheduler as per your preference.
Now that you know what SalesBlink does, let’s move ahead.
SalesBlink Plans and Pricing
SalesBlink has 3 different plans to offer :

Scale – $29/mo
Growth– $99/mo
Business– $199/mo
You get a discount of 15% if you choose yearly billing.
What’s more, is that you get a 7-day trial for free.
Step-By-Step Guide To Use SalesBlink
Excited to know more about SalesBlink? Let’s go on a detailed tour of SalesBlink to see how each of its features works so that you can see how it can simplify your tasks.
You will start with finding leads, which is generally the case with most cold outreach tools. This is the first step of the sales process, and if you make the right efforts at this stage, it will be helpful later on.
Search For Companies
Searching for companies to target in your business outreach is a strategic process that can be significantly enhanced with the right tools. LinkedIn Sales Navigator, Lusha, and Seamless.AI are three powerful platforms that can streamline your search and ensure you’re connecting with the right businesses.
LinkedIn Sales Navigator is a premium feature designed for sales professionals looking to find potential clients on LinkedIn. To use it, start by defining your target industry, company size, and geographic location. Sales Navigator allows you to save these preferences and receive recommendations based on your search criteria. You can further refine your search by using keywords and filtering companies based on their current activities and news updates.
Lusha simplifies the process of gathering contact information once you’ve identified potential companies. With its browser extension, you can visit a company’s profile on social media or their website, and Lusha will provide you with the contact details of key decision-makers. It’s as simple as clicking the Lusha icon in your browser toolbar to reveal email addresses and phone numbers.
Seamless.AI offers an AI-driven approach to finding companies and their contacts. After signing up, you input your target market criteria, such as industry, company size, and job titles of the people you’re trying to reach. Seamless.AI then generates a list of companies and contacts, including verified email addresses and phone numbers. The platform integrates with CRM systems to automate the outreach process further.
Utilizing these tools in your search for companies can make your outreach efforts more targeted, efficient, and, ultimately, more successful.
Create Lists With SalesBlink
Now that you have found leads, you would want to waste no more time in reaching out to them, but there is one more step in between – creating a list.
Here’s how you can go about creating your list:
1. Go to ‘Lists’ and click on ‘+ New List’.

2. Upload your CSV file and click on ‘Next’.

You can download the sample CSV file by clicking on ‘Download Sample File’.
Feel free to edit the file in Microsoft Excel by adding more columns and records to it.
Upload the sample file and this is what you can see,

3. Start mapping the fields with SalesBlink property. Feel free to choose ‘skip field’ for data that is not required.
Mapping is used for adding dynamic variables for personalization in your emails like {{first_name}}, {{company_name}}.
You can add these in the email body, subject line and images for personalization.

4. If you have mapped the “Email” field, you can choose to verify emails in your list.

5. Now, name the list and click on ‘Next’.

You just created the list! Looks easy, right? At SalesBlink, we ensure that you have the best user experience.
Now, go ahead and use the list to create a sequence!
Create Sequences with SalesBlink
It is finally time to create your outreach sequence with SalesBlink.
You can reach out to the prospect across multiple channels, from email and LinkedIn to SMS and phone call. SalesBlink automates email outreach for you, and for the rest of the channels, you can create tasks in your sequence.
There are five ways of creating a sequence, and that includes
- Creating a sequence from scratch
- BlinkGPT AI Assisted sequence
- BlinkGPT AI Personalized sequence
- Creating a sequence from your templates
- Make a copy of your existing sequence
Let’s take a look at each of them,
Creating a sequence from scratch
Creating a sequence from scratch is the conventional way of building an outreach sequence in email.
Here are the steps involved,
1️. Go to the dashboard and click on ‘Outreach’ followed by ‘Sequences’.
2️. Click on ‘Create New Sequence’.

3️. Name the sequence and select ‘Create from Scratch’ from the two options that appear and click on ‘Save’.

4. When you save the sequence, the visual sequence builder opens.
A pop-up will appear asking you to connect to a list.

Once you connect to the list, you can go about creating the sequence.

5. Click on the ‘+’ sign and select either ‘Email Outreach’ or ‘Task’.
When choosing email outreach, you must select the template you created previously or create a new one.
Creating A New Template
If you have not created an email template, here’s how to go about it,
Upon clicking “Create New Template”, the email template generator will open.
You can write your email using it.

As you can see, there’s a spam checker to provide the overall score of the email. You can tweak your email template accordingly to ensure good email deliverability.
Now, save the template.
6. You can ‘Insert’ the template you just created in the Email Outreach Block.

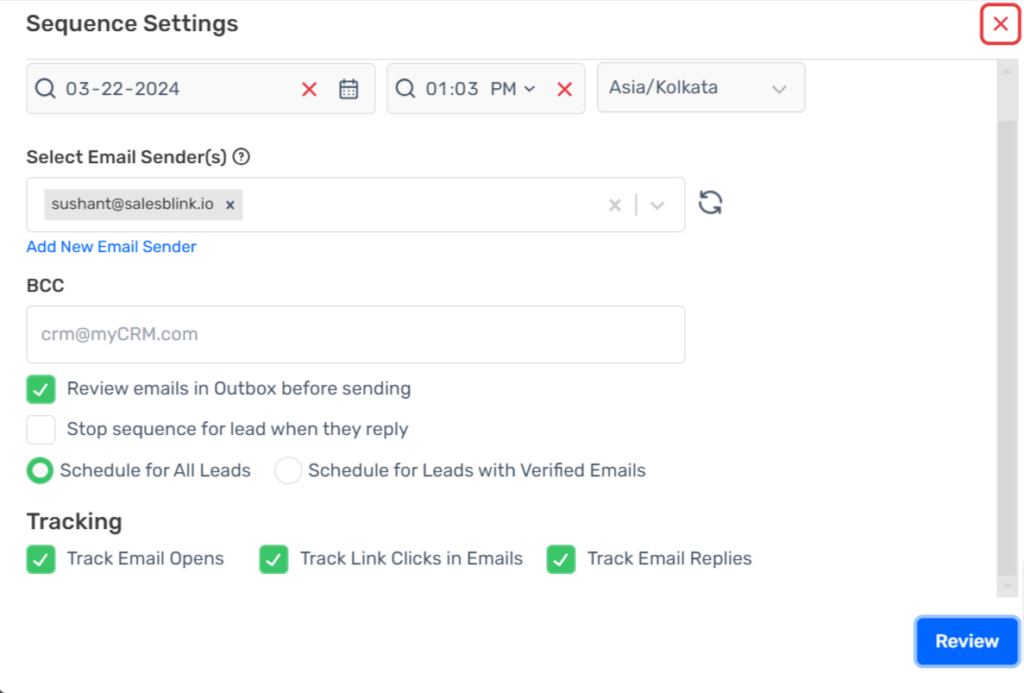
7. Click on ‘Save & Launch’, the sequence settings will open where you can schedule the sequence by setting the date, time and time zone.

Select the email sender you want to send the outreach emails from or add a new email sender.
To review your emails before sending them to prospects, check the ‘Check Emails Before Sending ‘ checkbox.
Also, you can choose the type of email addresses in your list you want to send emails to. You can send either to all kinds of emails or only to the verified ones.
When you select verified email, you have the option to choose to send to the following:
– Valid email
– Risky email
– Invalid email
However, it is quite obvious that you would want to send emails to valid email addresses for better sender reputation and email deliverability.
Also, feel free to track email opens, clicks and replies by checking the respective boxes. This way you can measure the performance of your sales outreach sequence.
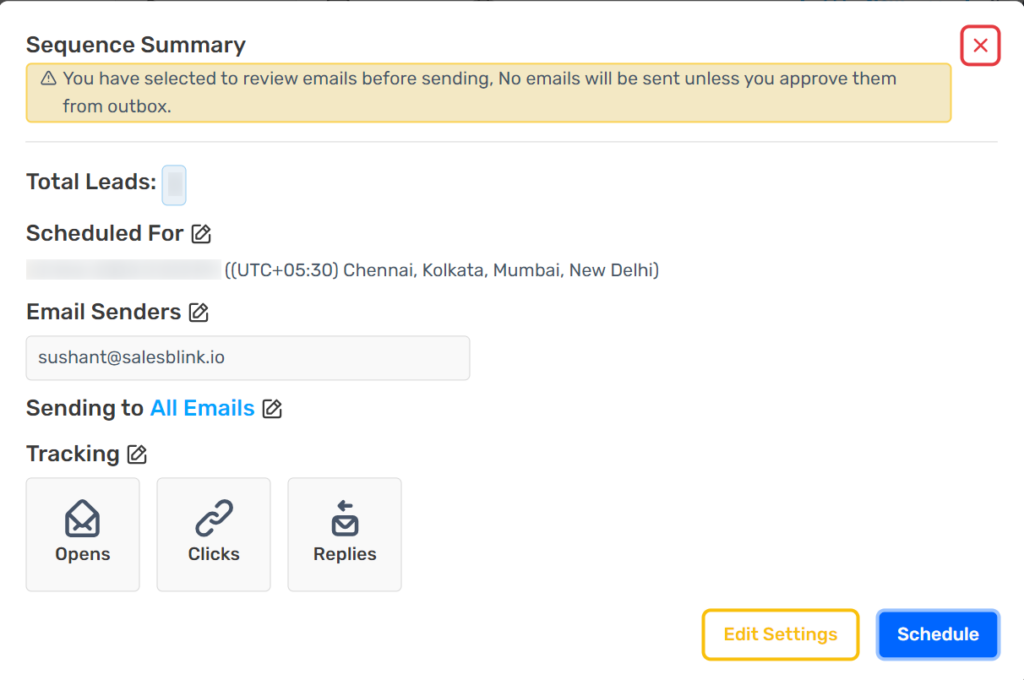
5️. Finally, click on review to view the summary and hit schedule.
You can review the emails before scheduling them as you can see below. Once you are done, you can click on ‘Approve and Schedule’ .

And that’s it! You just launched your first outreach sequence from scratch.
Generating a template using BLINKGPT
You have the option to generate the template using BlinkGPT and save time.
Did that surprise you? We’re sure it did!
Generative AI has revolutionized how people work and is the most trending topic. So, how can we not be a part of it?
Now, there is not need to think hard and write a cold email from scratch. SalesBlink’s BlinkGPT let’s you generate a high-performing cold email with just a click.
Here’s how to go about generating your email with SalesBlink,
- Go to Outreach > Templates
- Click on ‘Create New’ and select ‘Create Email Template’ from the drop-down.
While you can write your email template from scratch in the email template editor that opens, there is the option to generate it using BlinkGPT by providing a prompt.
We have trained BlinkGPT to write high-performing cold emails that get you more replies.
- Name the template, enter the prompt in the ‘BlinkGPT Prompt’ field, click on generate to get a complete email body with subject line.

You can save this template after you make changes to it if required. This is important because you may want to describe your product or service differently.
That’s how you can create a template in BlinkGPT-backed SalesBlink.
Creating a sequence from templates
Creating a sequence from templates is like crafting a tailored journey for each potential lead, guiding them gently from the first hello to the final handshake, all while keeping it personal and impactful. Here’s the process to help you set up your sequence using SalesBlink, ensuring your cold outreach feels anything but cold.
1. Sign in to Your SalesBlink Account
Kick things off by logging into your SalesBlink dashboard. If you’re new around here, creating an account is as easy as pie, and you’ll be up and running in no time.
2. Dive into the Sequence Section
Once logged in, go to the ‘Outreach’ section and then navigate to the ‘sequence’ section. This is where the magic happens, allowing you to manage and create new outreach sequences with just a few clicks.
3. Select ‘Create New Sequence’
Spot the ‘Create New Sequence’ button. Click on it to start the process. Here, you’re taking the first towards building a bridge between you and your future clients.
4. Choose a Template
SalesBlink offers a variety of templates tailored for different stages and types of outreach. Browse through and pick the one that aligns with your sequence’s goals. Whether it’s a friendly introduction or a follow-up, there’s something for every scenario.
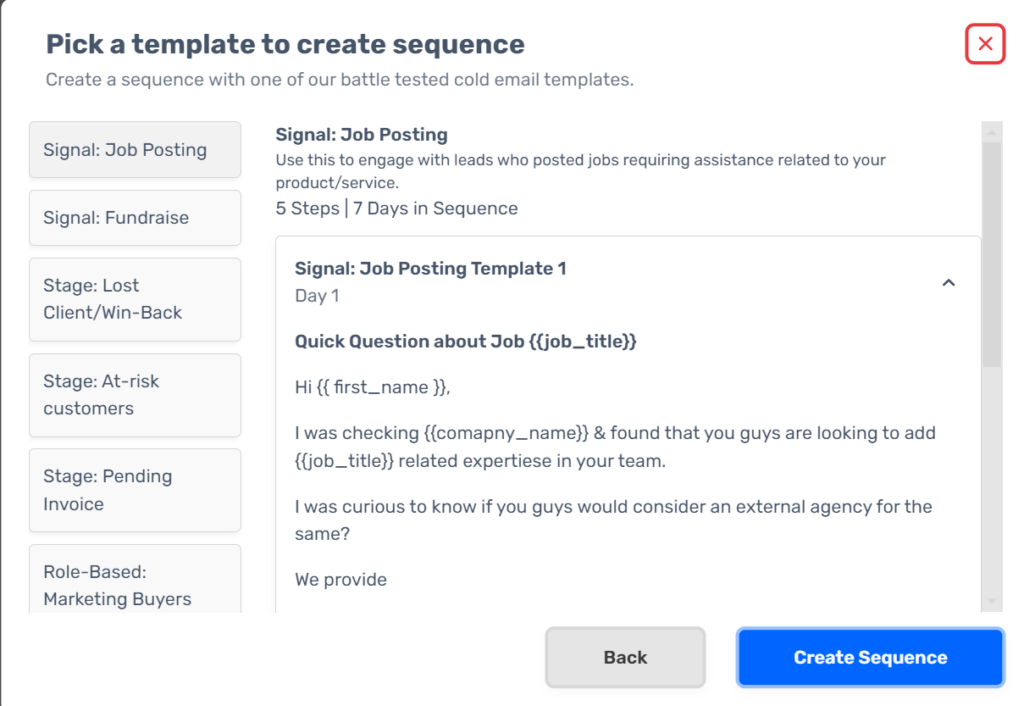
5. Set Up Your Sequence
After choosing your template, it’s time to sequence your emails. Decide the order and timing of your follow-ups. SalesBlink lets you schedule these emails at intervals that make sense for your audience, ensuring you stay on their radar without being overwhelming.
6. Add Conditions (Optional)
SalesBlink allows you to add conditions based on the recipient’s interaction for an even more targeted approach. Did they open the email? Click a link? Tailor the journey based on their actions, making each as relevant as possible.
7. Review and Launch
Before you hit the launch button, give everything a once-over. Check the content, the sequence order, and the timing. Once satisfied, launch your sequence and watch as SalesBlink automates the outreach process, saving you time while increasing your chances of success.
Make a copy of your existing sequence
Duplicating your existing sequence in SalesBlink is like cloning your best-performing outreach strategy so you can use it again with just a few tweaks. This guide is your handy roadmap to making a copy of your sequence, ensuring your outreach efforts are both efficient and effective.
1. Log Into SalesBlink
Start your journey by logging into your SalesBlink account. It’s your gateway to simplifying and automating your outreach process, so if you haven’t signed up yet, now’s the time!
2. Navigate to the sequence Section
Head over to the ‘sequence’ section under the ‘Outreach’ section on your dashboard. This is where your outreach sequences live and breathe, and where you’ll begin the process of cloning your sequence.
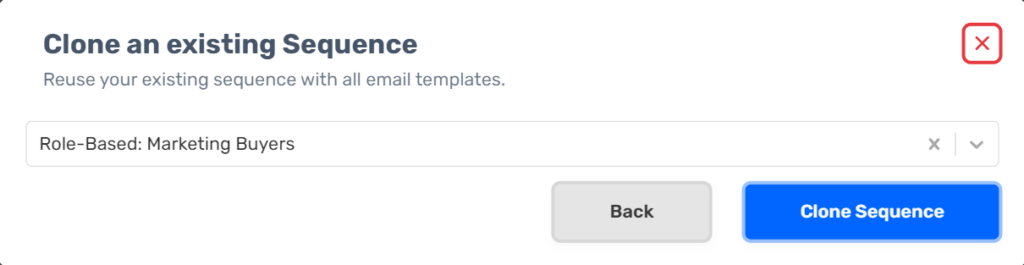
3. Find Your Existing Sequence
Scroll through your list of sequences to find the sequence you wish to duplicate. Whether it’s a tried-and-true sequence that’s yielded great results or a template you’ve meticulously crafted, it’s all within reach.
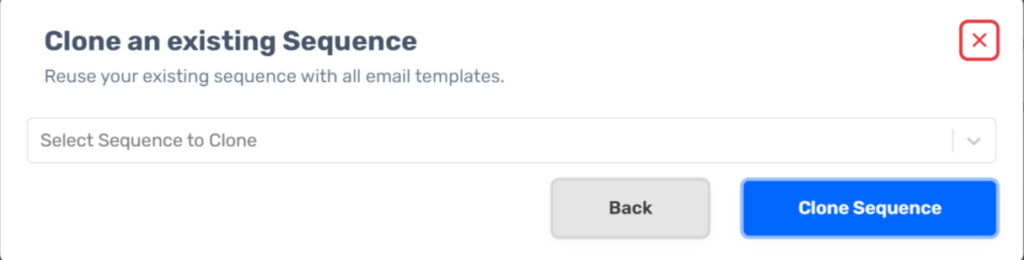
4. Select the sequence
Once you’ve located your sequence, click on it. Here, you’re one step closer to creating a perfect replica of your outreach sequence.
6. Click Clone
Hit the ‘Clone’ button, and SalesBlink will show your choosed sequence.
7. Edit Your New Sequence (Optional)
After the copy is created, you might want to make some adjustments. SalesBlink allows you to edit your new sequence, whether it’s updating the email content, changing the timing, or modifying the follow-up steps. This step is where you tailor the cloned sequence to fit a new target audience or goal.
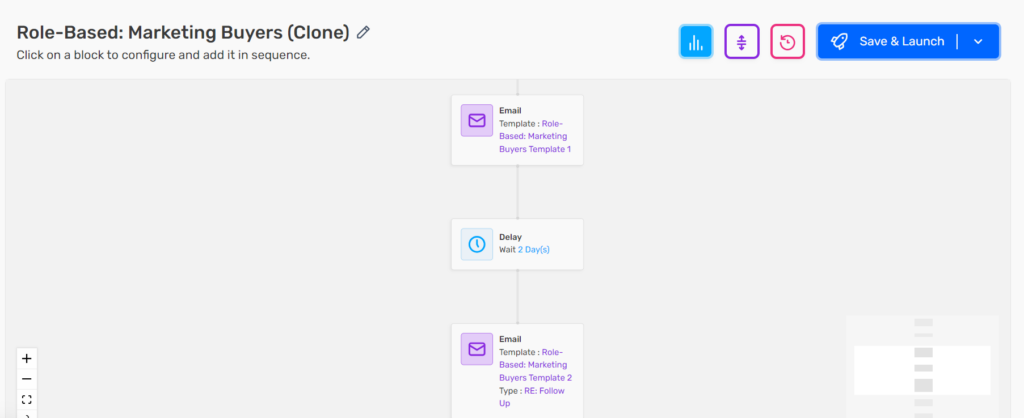
8. Review Your Copied Sequence
Take a moment to review your newly created sequence. Ensure everything is in order, from the email content to the sequence of follow-ups. This is your chance to catch and correct any discrepancies.
9. Launch Your New sequence
With your copied sequence fine-tuned and ready to go, it’s time to launch. Set your sequence live and watch as SalesBlink automates your outreach, giving you more time to focus on building relationships and closing deals.
BlinkGPT AI Assisted sequence
Introducing BlinkGPT AI Assisted sequences in SalesBlink. your newest ally in crafting compelling, personalized outreach sequences that resonate with your audience. This innovative feature leverages the power of AI to help you create sequences that not only engage your prospects but also significantly improve your response rates. Let’s dive into a simple, step-by-guide to setting up your first AI-assisted sequence in SalesBlink, keeping things light and informative.
1. Log Into SalesBlink
Begin by signing into your SalesBlink account. If you haven’t explored SalesBlink yet, you’re in for a treat with its user-friendly interface and powerful outreach tools.
2. Access the sequence Section
Navigate to the ‘Sequence’ section under the ‘Outreach’ section on your dashboard. This is where the magic happens and where you’ll start creating your AI-powered outreach sequence.
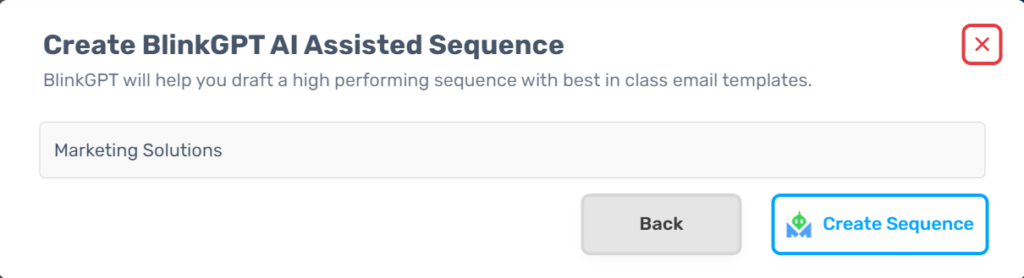
3. Choose ‘Create sequence’
Click on the ‘Create sequence’ button to kick things off. Here, you’re just a few steps away from harnessing the power of AI for your outreach efforts.
4. Select ‘BlinkGPT AI Assisted Sequence’
Look for the option to create a BlinkGPT AI Assisted sequence. This selection is your gateway to utilizing AI in crafting personalized, engaging email sequences.
5. Input Your sequence Details
Provide the AI with details about your sequence, including your target audience, the tone of voice you prefer, and any key messages or value propositions you want to highlight. The more information you give, the better tailored your sequence will be.
6. Let AI Do Its Magic
Once you’ve fed in the details, hit the ‘Generate’ button and let BlinkGPT do its magic. The AI will craft a sequence of emails based on your inputs, creating content that’s both personalized and optimized for engagement.
7. Review and Customize the Generated Sequence
After the AI presents you with the generated sequence, take some time to review it. While BlinkGPT is quite savvy, adding your personal touch can make the sequence even more effective. Feel free to tweak the content, adjust the timing, or add follow-up steps as you see fit.
8. Set Up Your Sequence and Launch
With your AI-assisted sequence polished and ready, set up the sequence order and timing in SalesBlink. Once everything looks good, launch your sequence and watch as your AI-enhanced emails start rolling out, automating your outreach with a personal touch.
BlinkGPT AI Personalized sequence
Harness the power of AI to revolutionize your cold outreach with BlinkGPT AI Personalized sequences in SalesBlink. This innovative feature uses advanced AI to tailor your outreach, making each message feel like it was handcrafted just for the recipient. Here’s a friendly, step-by-guide to creating your own BlinkGPT AI Personalized sequence in SalesBlink, ensuring your outreach resonates on a personal level.
1. Sign Into SalesBlink
Begin your journey by logging into your SalesBlink account. If you’re new to SalesBlink, you’re about to discover a world of streamlined outreach possibilities.
2. Navigate to sequences
Once logged in, head to the ‘sequences’ section under the ‘Outreach’ section on your dashboard. This is where you’ll find the tools to launch and manage your outreach sequences.
3. Initiate a New sequence
Click on the ‘Create sequence’ button to start crafting your new outreach effort. You’re on your way to creating a sequence that stands out.
4. Opt for BlinkGPT AI Personalized Sequence
When selecting the type of sequence, choose the BlinkGPT AI Personalized sequence option. This is your ticket to leveraging AI for creating highly personalized outreach emails.
5. Provide Detailed Information
Give the AI as much information as possible about your sequence, including details about your target audience, the tone of voice you prefer, and any specific messages or offers you want to highlight. The more context you provide, the more personalized and effective your sequence will be.
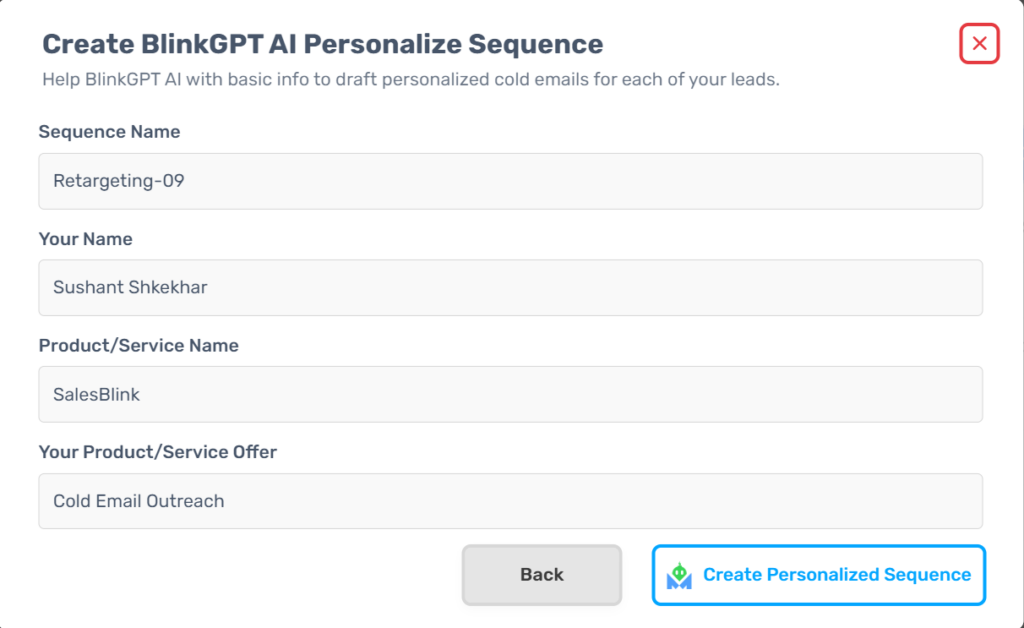
6. Generate Your Sequence
With your inputs ready, hit the ‘Generate’ button and allow the BlinkGPT AI to work its magic. It will create a sequence of personalized emails designed to engage your target audience effectively.
7. Review and Refine
After the AI generates your sequence, take a moment to review it. The AI does a great job at personalization, but adding your unique flair can enhance the sequence further. Adjust the content, timing, or add follow-ups as needed to match your brand’s voice and sequence goals.
8. Finalize and Launch
Once you’re satisfied with your personalized sequence, set up the order and timing for your emails. Finalize your sequence setup, and then launch it. Your AI-personalized emails are now ready to make a mark, combining the efficiency of automation with the power of personal touch.
Email Personalization With SalesBlink
As you have seen, you can add variables such as {{first_name}}, {{last_name}}, to your email body and subject line as text personalization. When you send the email, the variable gets replaced with the corresponding value saved in the list. This way, you give a tailored look to your email with minimal effort.
Apart from that, SalesBlink lets you use image personalization to get the prospect’s attention and connect with them better.
Let’s take a look at how it is done,
- Click on ‘Personalize Image’.

- You can use a sample photo or upload one from your computer.

2. In the image, you can enter the text you want to display and modify it the way you want.
For example, here’s what you can write something like the following as the image text,
Hi {{first_name}}
Here, {{first_name}} is the variable.
The first name of the prospect will appear in the image, and you won’t have to keep changing it for every email you send. The prospect will think that you have tailored the image for the prospect, making them feel special. And that’s good for you as they may show interest in your product or service.

LinkedIn Outreach
LinkedIn is the most widely-used professional networking site that sales professionals prefer and we bet you can’t agree more.
Sending LinkedIn messages is a great way to reach out to prospects, and it is beneficial to incorporate it into your outreach strategy. After the initial email, you can send LinkedIn messages or a request to connect. It goes without saying that sending messages on LinkedIn will make you look more professional.
SalesBlink helps you create tasks to send LinkedIn messages. You can easily add these tasks to your sequence. Though sending inmail messages is not automated in SalesBlink but it can get you started.

Email Warm-up
You may know that you must warm up any new email account before starting your outreach sequence. If you send thousands of emails at once from it, you will land in the spam folder, and the ESP will blacklist you!
You wouldn’t let that happen, would you?
Before you can go ahead with full-fledged emailing, you must earn a name for your domain and show your ESP that you are genuine and not a spammer.
You have to warm up your domain, which begins by initially sending only a few emails.
After that, you can increase the volume every week until you build a solid sender reputation.
Having a tool do it for you can be amazing!
SalesBlink helps with just that with its email warm-up feature.
It automates the entire process for you and improves email deliverability so that your emails land in the primary inbox of recipients and not in the spam folder.
Here’s how you can use this feature,
1️. Go to ‘Outreach’ > ‘Email Senders’ and click on ‘Add Sender’.
2️. Enter the details asked for and enable warm up by checking the checkbox under ‘Warm Up Settings’.

3️. Click on ‘Next’ and you are done!
Now relax and watch your account getting warmed up on autopilot!
SalesBlink’s Meeting Scheduler
Meetings with prospects help you seal the deal. And that means they are important. So, why don’t you make it easier for prospects to schedule them with you?
Letting prospects book a meeting with you can’t get easier with SalesBlink’s in-house meeting scheduler.
It does away with the rally of emails sent back-and-forth to decide the date and time.
Here’s how to go about it,
1. Click on ‘Meet’ from the top menu of the tool’s home page.
2. Connect your Google or Outlook Calendar and grant access.

3. Write out a slug/back half for your meeting scheduler link.
4. Select the calendar where you would like the meetings to be saved.
Now you can go ahead and copy your meeting scheduler link to share it with prospects in outreach emails.
Just go to ‘Meet’ > ‘My Calendar’ and click on ‘Copy Link’ to copy the link of the meeting scheduler.
You can paste the link to your outreach email template.
Here’s how the scheduler will look like when you open the link in your browser window,

Note: Feel free to specify your availability by changing your working hours by going to ‘Meet’ > ‘Settings’.
SalesBlink’s Free Tools
Along with our sales automation tool that reduces manual tasks, we offer a few handy free tools. They can be the perfect addition to every salesperson’s toolkit. Let’s take a look at them,
Free Email Subject Line Generator
If the email subject line is not attractive enough, why would anyone even want to read what is inside the email? Agreed?
However, coming up with catchy subject lines each time you draft an email is challenging, and that is why we have a free tool for you that will be useful. It helps in generating subject lines that will fetch you high open rates. It would help reduce your work to a great extent.
Here’s how the tool works,
Enter the product or service your business deals in, with the target company’s name.
Click on the ‘Generate subject lines’ button.

You will get 5 subject lines along with their open rates so that you can choose what works best for you. If you don’t want to use them straight away, they can work as an inspiration to help you write another one.
Free Email Verification Tool
You can use SalesBlink’s free tool for email verification. Just enter the email address you want to check and click on ‘Verify Email’. The tool will show you whether it is valid or not.

Free Email Spam Checker
SalesBlink’s free email spam checker lets you check your emails for spammy words. You can remove them before sending the email to prospects to ensure it lands in the inbox and the spam filters don’t withhold it.

Free Email Permutator
With SalesBlink’s free email permutator, you can guess someone’s email address with the help of their first name, last name and company domain.

Free Sales Commission Calculator
With SalesBlink’s free commission calculator, you can easily calculate sales commission for your team based on the model your company employs.
Simply enter the values to get the sales commission as the output.

Get Ready To Use SalesBlink Today!
As you can see, SalesBlink is a fully-loaded tool that takes you from outreach to closing swiftly. In addition, it automates every step so that your team’s workload gets significantly reduced.
As a salesperson, you would have a lot on your plate already. So, it is better to automate tasks that take away a significant chunk of your time. SalesBlink helps you do just that.
So what are you waiting for? Build a flawless sales process with SalesBlink, and you will never regret it! Sign up now!
FAQs
SalesBlink is an all-in-one full-stack sales outreach tool that takes you from outreach to closing lightning fast. The speed and automation that make SalesBlink a one-stop solution for cold outreach.
An outreach campaign has a mix of emails, phone calls, and LinkedIn messages. It usually starts with an email. Once you get the prospect’s email address, verify it, and perform research. You can then begin your outreach.
Email warmup helps improve email deliverability so that your emails land in the primary inbox of recipients and not in the spam folder. The process involves increasing the number of emails sent each day.


